Cartoony Pose Drawing: Fix Stiff Poses and Improve Figure Movement
Cartoon Pose Drawing: Make Stiff Figures Feel More Natural
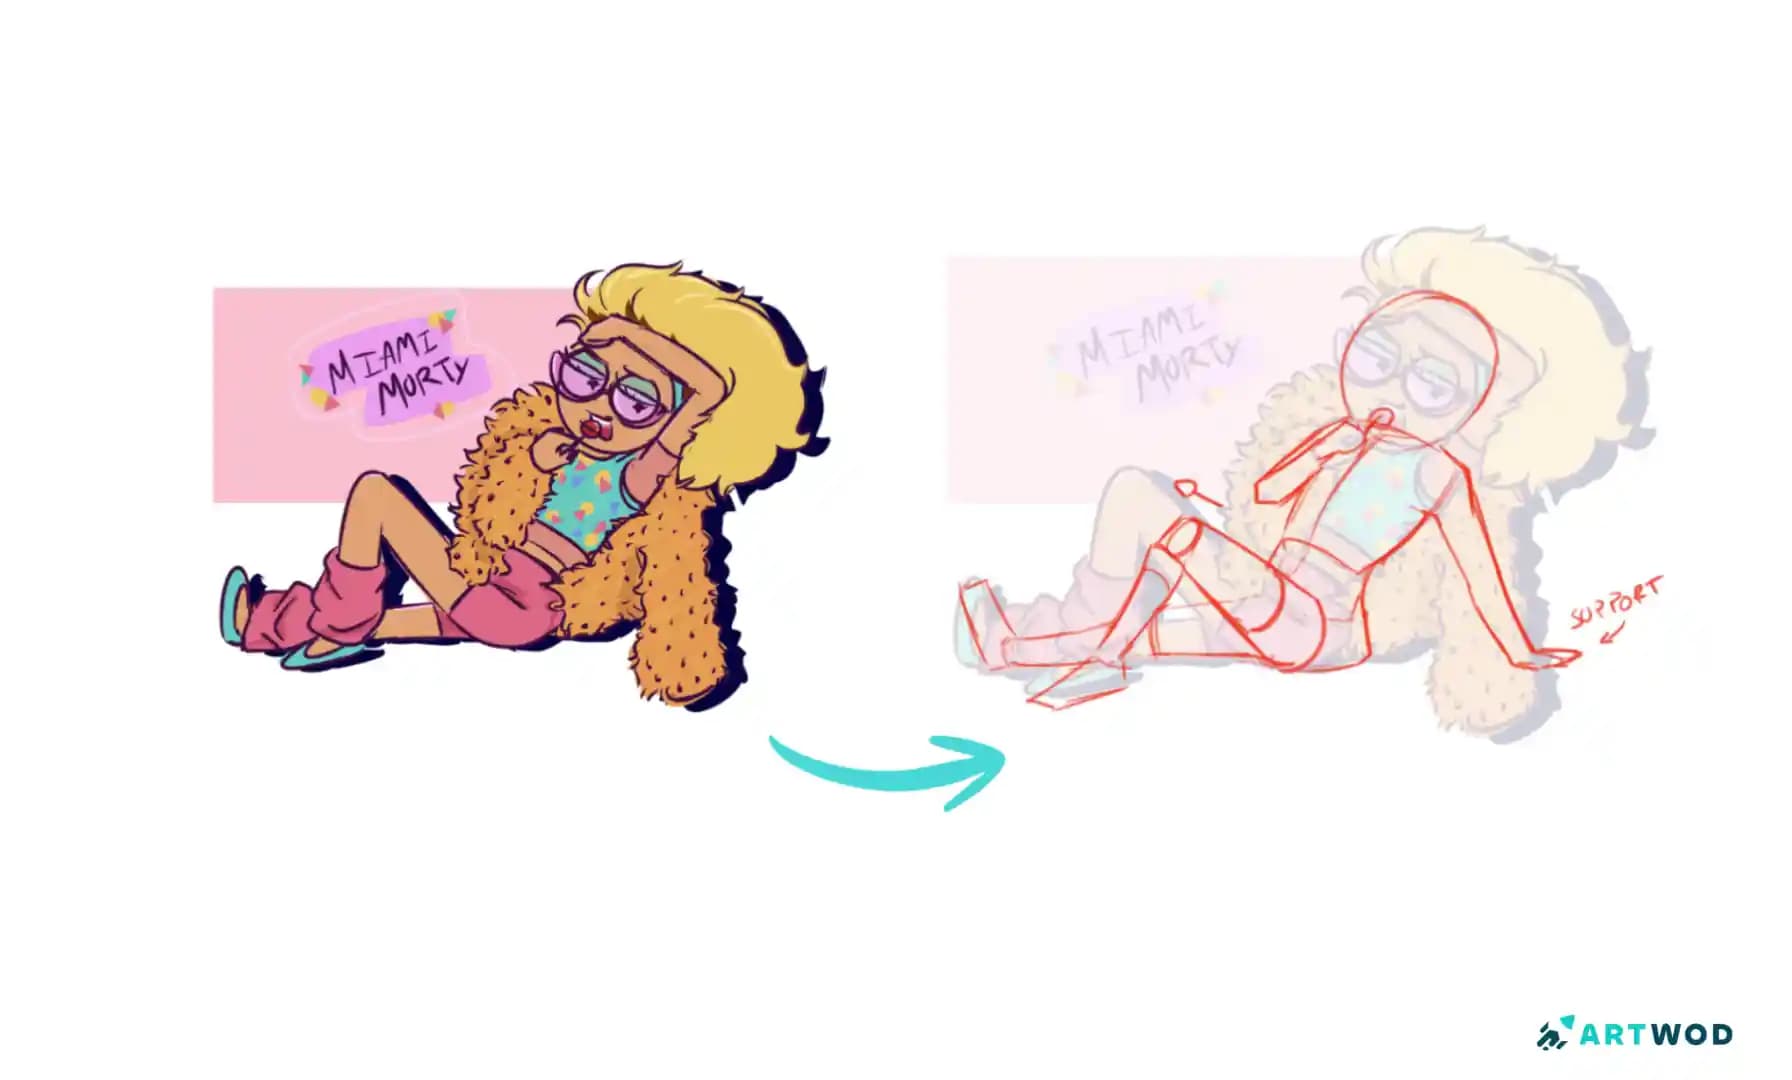
The “Miami Morty” (from Rick and Morty, Wubba Lubba Dub Dub!) submission on the Artwod Community is a great example of a pose that has plenty of personality but still feels slightly stiff. The artist specifically asked how to make the pose feel more natural and welcomed other criticism.
Insights shared in this blog post are by: @gabrielle34427. You can also request feedback on your artwork in Artwod’s Art Community.
The Feedback Request: Why Does the Pose Feel Stiff?
The artist behind “Miami Morty” asked:
“how can i make his pose seem more natural? it seems stiff to me (any other criticisms are welcome too)”
The artwork already has a strong visual identity.
Morty is reclining with bent legs, one arm raised near the head, another arm extending downward, and a large furry-looking coat surrounding the body. The bright clothing, oversized hair, sunglasses, and relaxed setup give the character a distinct attitude.
The issue is less about making the drawing more detailed and more about making the underlying figure feel like it has weight and balance.
The paintover makes that clear by stripping much of the character design back to simple construction lines. The head becomes a basic form, the torso is simplified, and the limbs are represented as connected shapes.
There is also a clear “SUPPORT” indication beneath the extended arm.
That is an important clue for understanding the pose.
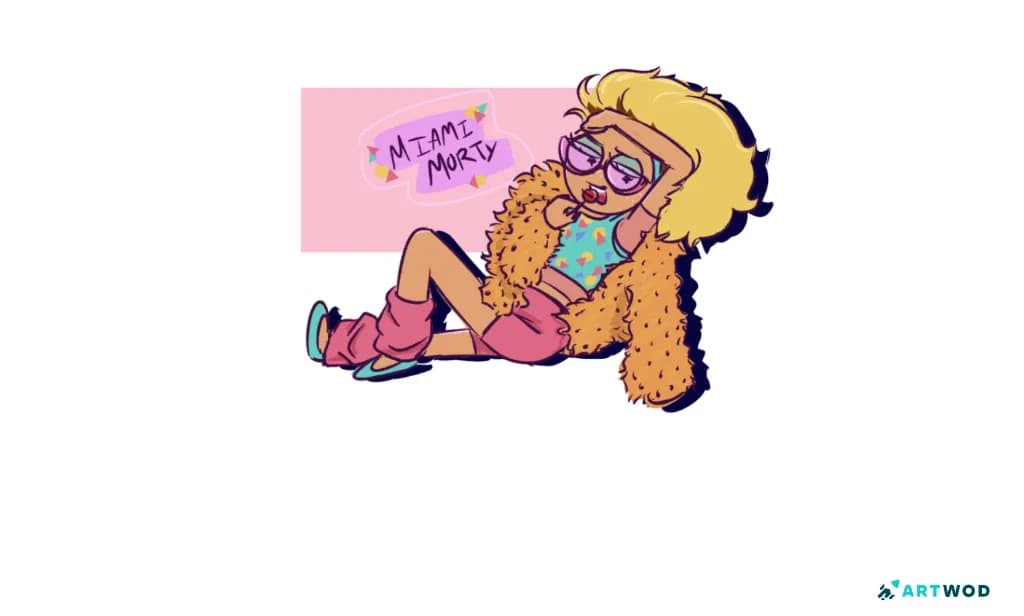
Stylized Rick and Morty character reclining with bent legs, one arm raised near the head, colorful clothing, sunglasses, and a large yellow coat
Start With the Gesture, Not the Clothing
The original character has a lot of visual information: hair, sunglasses, a patterned shirt, shorts, shoes, and the large coat.
Those elements make the finished illustration interesting, but they can also make it harder to diagnose the pose.
When a figure feels stiff, temporarily ignore the costume.
Reduce the character to:
Head
Ribcage
Pelvis
Upper arms
Forearms
Thighs
Lower legs
Feet
Then ask whether the simplified figure still looks relaxed.
If it does not, adding clothing folds or surface details will not solve the problem.
Establish the Line of Action
A natural pose usually has a clear directional flow through the body.
In a reclining character like this one, that flow can travel from the head through the torso and into the pelvis and legs.
The paintover makes this easier to see because the figure is reduced to a few broad construction lines.
Try drawing one long gesture line before constructing the anatomy.
It can curve through the major movement of the pose rather than following the exact outer contour.
The purpose is not anatomical accuracy. It is to capture the energy and direction of the figure. This is what will make a dynamic pose. I also suggest creating some level of contrast in the pose. This can look curved for one side of the body and a more straight edge for the other, or often called the “pinch and stretch.”
The concept is demonstrated in this paintover, with the slight tilt of the pelvis in the opposite direction of the ribs. Even without it drawn, the line of action is clear. It also emphasizes another factor, to make sure to balance correct anatomy while following the gesture.
If you, like me, struggle to visualize the line of action just off the pose, you can draw the line to base your pose around.
If that gesture feels rigid, the finished pose is likely to feel rigid too.
Think About the Ribcage and Pelvis Separately
One common reason a figure feels stiff is that the torso is treated as one solid block.
Instead, think about the ribcage and pelvis as separate masses. They can tilt, rotate, and shift relative to each other.
For this reclining pose, that separation is particularly useful. The character does not need to sit upright like a mannequin. The torso can lean and twist while the pelvis establishes a different angle.
For me, poses that play with this by pushing the ribcage and pelvis in opposite angles tend to make poses more visually interesting.
Try this construction:
Draw a simple oval or box for the ribcage.
Draw another simple form for the pelvis.
Connect them with the spine.
Tilt the two masses relative to each other.
Attach the limbs afterward.
This creates more natural movement before you even begin drawing the character's clothing.
If desired, I would also play around with the perspective of the pose, as that can often makes your pose feel more dynamic.
A great example of using perspective and dynamic posing is this Artwod submission to anime girl torso drawing looks way too flat. Here the paintover highlights that it’s important to keep gesture but also structure, so the pelvis and ribcage look like they connect together. They’re not parallel to each other, which results in the pose looking dynamic.
Give the Figure Something to Push Against
The paintover's most direct annotation is “SUPPORT”, pointing toward the hand/arm area extending down beside the body.
This is an important principle in pose drawing.
A body does not simply float in space. It interacts with something.
If the character is reclining, sitting, leaning, or supporting their weight with an arm, that contact point should help explain the pose.
Ask:
Where is the character's weight going?
Then ask:
What is stopping the character from falling?
In this drawing, the supporting arm can help establish the character's relationship with the surface beneath them.
Making that relationship clearer can immediately make the pose feel more believable.
Check the Weight Distribution
A relaxed pose still needs balance.
Look at the character's major contact points:
The lower body
The feet or legs
The supporting arm
The surface beneath the character
Imagine the body's center of mass. Establishing the center of gravity can help adjust to pose to look like it fits realistically in space. This tends to originate from where the most amount of weight is carried, in the paintover this would be the arm. Important note: the line of gravity tends to be separate from the line of action.
Does the figure appear to be supported by the points touching the ground or nearby surface?
If the answer is unclear, the character may feel like they are hovering rather than reclining.
This is one reason the simplified paintover is useful: it makes the weight-bearing structure easier to see than the finished costume does.
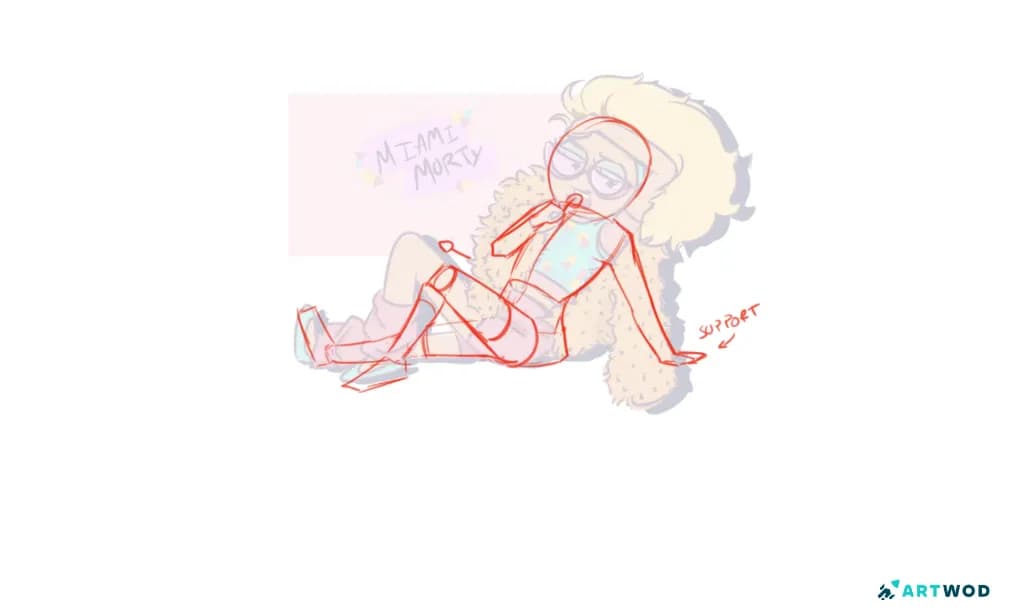
Rick and Morty pose drawing paintover showing simplified figure construction, joint placement, body direction, and a support point beneath the character
Avoid Straight, Parallel Limbs
Another common cause of stiffness is drawing limbs as if they are perfectly straight tubes. Variation creates more visual interest, consider the change in width between the wrist, the definition of the elbow and knee.
The character has several bent limbs, which creates opportunities for more natural movement.
Pay attention to the relationship between:
Upper arm and forearm
Thigh and lower leg
Knee direction
Ankle direction
The joints should create a flow through the pose rather than producing a series of disconnected angles.
You can exaggerate these directional changes slightly in a stylized anime drawing without making the anatomy unrealistic.
Use Overlap to Create Depth
The original character has a large coat and overlapping limbs, which can make the pose visually complex.
Overlap can be useful rather than something to avoid.
When one body part passes in front of another, make the relationship clear.
For example, establish which limb is closer to the viewer and which one is behind it. This helps the pose read spatially instead of looking like a collection of shapes placed beside each other.
During the construction stage, simple overlapping cylinders and boxes are enough.
This submission with a pose of a women mid action pose, shows how overlap can be used to portray depth. The front leg, arm, and sword overlap the body, which gives the illusion of depth. With the paintover the limbs are made clearly separate from each other, resulting in a clear spatial relationship.
Another takeaway is remember we can use details (like the hair or belt) to create a more interesting composition.
A Simple Stylyzed Pose Drawing Exercise
Try rebuilding the pose without any costume details.
1. Draw the gestureUse one sweeping line to capture the overall direction of the reclining figure.
2. Add the ribcagePlace a simple volume along the gesture.
3. Add the pelvisTilt it in relation to the ribcage instead of making the torso one rigid block.
4. Place the limbsConstruct the arms and legs as simple connected forms.
5. Mark the support pointsIdentify where the body contacts or pushes against the surface.
6. Check the balanceImagine the character's weight. Make sure the support points actually explain how the body stays in position.
7. Add the character designOnly after the pose works should you add the hair, clothing, coat, accessories, and other details.
This process lets you solve the pose before getting distracted by the design.
Common Cartoony Pose Drawing Mistakes
Watch for these problems when a figure feels stiff:
Drawing the character's silhouette before establishing gesture
Treating the torso as one rigid shape
Making the ribcage and pelvis perfectly aligned
Ignoring where the character's weight is supported
Making limbs too straight
Forgetting which body parts are in front of others
Adding clothing details before solving the underlying pose
Drawing joints without considering their directional flow
If the pose feels stiff, simplify it.
A construction drawing often reveals the problem much faster than the finished illustration.
What Other Artists Can Learn From This Drawing
Gesture creates movement. Establish the body's overall direction before refining anatomy.
Separate the torso masses. The ribcage and pelvis can tilt and rotate independently.
Show support. Contact points help communicate weight and balance.
Use bent limbs deliberately. The direction of the joints contributes to the pose's energy.
Solve the figure before the costume. Character design should build on a convincing underlying pose.
Simplification is diagnostic. Reducing a finished character to basic forms makes stiffness much easier to identify.
How Community Feedback Can Help With Anime Poses
The artist's question is particularly useful because it identifies a feeling rather than assuming a specific anatomical mistake: the pose feels stiff.
That leaves room to examine the whole figure.
The paintover demonstrates how feedback can turn that vague feeling into concrete drawing problems: body construction, limb direction, balance, and support.
When requesting feedback on an anime pose, it can help to say what feels wrong even if you cannot diagnose the exact cause. A drawing may look stiff because of the gesture, anatomy, perspective, weight distribution, or several of these working together.
FAQs
Start with gesture and basic body construction before adding anatomy or clothing. Make sure the ribcage, pelvis, limbs, and support points create a believable flow and balance.
Why does my cartoon pose look stiff?A pose can feel stiff when the gesture is weak, the torso is too rigid, the limbs lack directional variation, or the character's weight is not clearly supported.
How do you make a reclining cartoon pose look natural?Establish the body's overall gesture, separate the ribcage and pelvis, bend the limbs naturally, and clearly identify where the character's weight is supported.
What is a line of action in anime drawing?A line of action is a simplified gesture line that captures the main movement and direction of a figure. It helps prevent the pose from becoming rigid before you construct the anatomy.
How do you show weight in an cartoon pose?Give the character clear contact or support points and make the body respond to them. The limbs and torso should visually explain where the character's weight is going. If you’re struggling to, drawing a line where the most amount of weight will fall can help with identifying how to add.
Should I draw anatomy before the pose?No. Establish the gesture and major body masses first. Anatomy and clothing become much easier to place once the underlying pose is working.
The “Miami Morty” drawing shows that a pose can have plenty of character and still benefit from stronger underlying construction. The artist's concern about stiffness is best addressed by looking beneath the costume and simplifying the figure into gesture, body masses, limbs, and support points.
Start with the line of action, separate the ribcage from the pelvis, establish the limb directions, and make the character's weight interact with the surface beneath them. Once that foundation feels natural, the colorful clothing and distinctive character design can sit on top of a much stronger pose.
The goal is not to make the figure perfectly anatomical. It is to make the character feel like they are actually occupying and balancing within the space. The Artwod community helps connect you with other artists who can give you feedback on artwork you share focusing on helping you learn. If you want to get feedback of your own, post your art in the anime category. Time to get schwifty!