How to draw Glowing Light and Secondary Lighting
How to draw Glowing Light and Secondary Lighting: Artwod Community Case study
A glowing subject can become the visual star of an artwork, but convincing glow depends on what happens around it.
Today we’re going to break down another Artwod Community submission. In this one, the artist used glowing jellyfish as a lantern and darkened the surrounding area to make them stand out, then asked how that light should affect the mermaid and the rest of the scene.

Lantern mermaid drawing with glowing jellyfish, a darkened surrounding area, and a secondary light source
The Artwork and the Problem
The artwork was submitted by @oscartejedor for the May Mermay Art Challenge (we host different challenges every month, winners get Artwod Premium, so don’t sleep on those!).
The artist wanted to create a lantern made from glowing jellyfish, which is a fantastic creative idea! But they were wondering: how should the lantern's light affect the mermaid and the rest of the drawing?
This makes the drawing a useful lighting study because creating a convincing glow is not about making the light source brighter. It is about showing how that light changes nearby forms.
A Glowing Object Needs a Light Effect Around It
One of the easiest mistakes when drawing glowing objects is to make the object itself bright without allowing the environment to respond.
A convincing glow has at least two components:
The light-emitting object
The light it casts onto nearby surfaces
To decide, how the light is going to affect the nearby objects, ask yourself these questions:
Which parts of the lit object are facing the glowing light source?
How far should the illumination extend?
Which parts should remain unaffected?
Does the surrounding environment pick up any of the light?
And remember, that even subtle changes can show the viewer that the lantern actually exists within the same physical space. No need for bright highlights everywhere.

Lantern mermaid drawing paintover feedback focused on glowing light and its effect on the surrounding artwork
How to Draw Glow Without Making Everything Bright
A common misconception is that a stronger glow requires more bright areas. But actually, the opposite is more effective.
If everything around the light source becomes bright, the light loses its hierarchy. The viewer can no longer distinguish between the source and the surfaces receiving its illumination.
Instead, create a clear progression:
Bright source → nearby illuminated forms → weaker influence → surrounding darkness
For the lantern mermaid drawing, the jellyfish can remain the brightest point while the mermaid receives a more restrained version of that light. The surrounding darkness then becomes part of the effect rather than simply empty space.
How to Light the Character With a Secondary Light Source
Treat the jellyfish as a real light source even if it is not the primary illumination in the scene.
Step 1: Identify the glowing light's positionDetermine where the light source is located relative to the subject. This establishes which surfaces can realistically receive the light.
Step 2: Find the planes facing the light sourceNot every part of the character should receive equal illumination. Look for surfaces oriented toward the light source. These areas are the natural candidates for the strongest secondary-light effect.
Step 3: Add a restrained light responseIntroduce the light source’s color gradually. You might see the effect on:
nearby skin
hair
clothing
reflective or lighter surfaces
surrounding objects
The effect should generally become weaker as the surface moves farther from the source. And remember to keep materials in mind - skin and metal will react to light differently.
Step 4: Preserve the main value structureDo not allow the secondary light to flatten the entire drawing - the primary value relationships should remain readable.
The lantern light is there to interact with the existing forms, not erase the distinction between light and shadow.
Step 5: Compare the source with its influenceZoom out and ask whether the viewer can distinguish:
what is glowing
what is illuminated
what remains in shadow
If those three categories are clear, the lighting will usually feel more convincing.
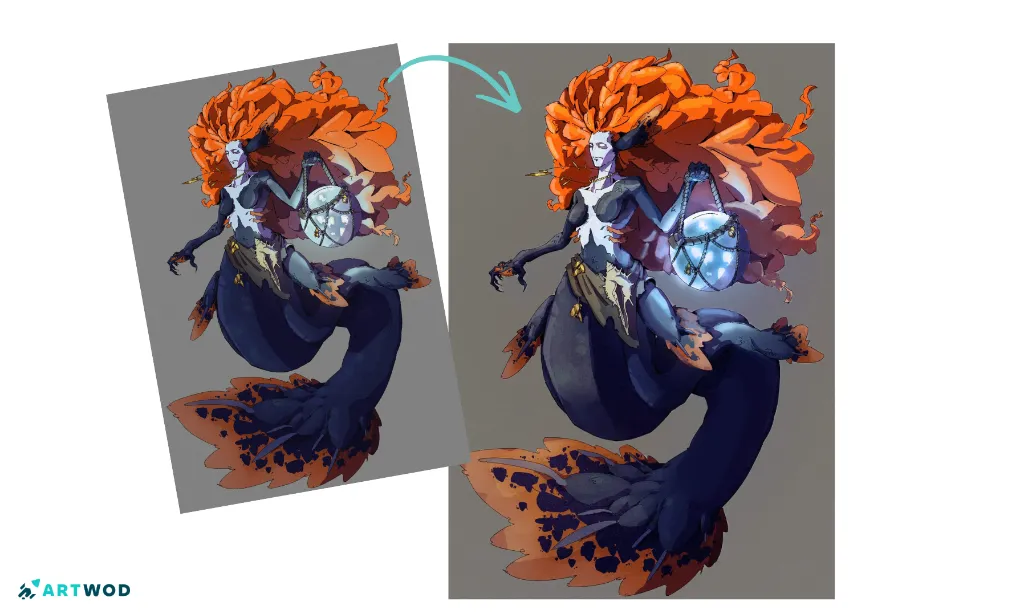
Lantern mermaid drawing featuring glowing jellyfish used as a lantern and secondary light source
The Surrounding Darkness Is Doing Important Work
The artist specifically described darkening the area surrounding the glowing jellyfish to make the subject stand out.
That is an important value principle: light is easier to perceive when it has a darker context.
Imagine placing the same glowing object against:
a very bright background
a medium-value background
a very dark background
The object itself has not changed, but its perceived luminosity will.
This means the darkness surrounding the lantern is not merely a background treatment. It establishes the contrast that allows the glow to read.
However, avoid making the entire environment uniformly dark. The surrounding values should still provide enough information to establish space and form.
Don't Let the Secondary Light Become the Main Subject
The artist's concern that the lantern might be glowing too much points to an important topic - composition.
A secondary light source should support the image's hierarchy.
Ask:
What should the viewer notice first?
Then ask:
What should they notice second?
If the jellyfish are intended to be the secondary source of illumination, they can be visually prominent without overpowering the mermaid or the central idea of the scene.
You can control this through:
brightness
saturation
contrast
size
edge sharpness
the amount of reflected light
how much of the surrounding environment responds
Increasing all of these simultaneously can make the light source dominate too strongly.
How to Practice Drawing Glowing Light
A great way to study this problem is to draw the same simple scene several times with different lighting strengths.
Study 1: Subtle glowKeep the light source bright but make its effect on surrounding forms very restrained.
Study 2: Moderate glowAllow nearby surfaces to receive more noticeable illumination.
Study 3: Strong glowPush the secondary light substantially farther into the environment. Then compare the three drawings. Do not ask which one is prettiest. Ask which one best communicates the intended lighting hierarchy.
This teaches you to control glow through relationships rather than relying on a single bright effect.
A Better Workflow for Drawing a Glowing Scene
For a drawing involving a glowing object, try this sequence:
Composition: Decide where the viewer should look first.
Primary light-source placement: establish the main light
Base values: Build the major light and dark relationships.
Secondary Light-source placement: Establish where the glowing object sits.
Source intensity: Decide how bright the glowing object should be.
Secondary illumination: Add the light's effect to nearby forms.
Falloff: Reduce the effect as surfaces move away from the source.
Color interaction: Introduce the light's color selectively.
Final contrast: Check that the source remains distinct from the surfaces it illuminates.
This workflow prevents the glow from becoming an isolated visual effect added at the end.
Common Glow and Lighting Mistakes
Making only the light source bright: The object glows, but the environment does not respond.
Making everything around the source bright: The light loses its hierarchy.
Using the same intensity everywhere: Realistic-looking illumination needs a sense of distance and direction.
Ignoring surface orientation: Light should interact differently with different forms.
Over-saturating the secondary light: Strong color can compete with the actual subject.
Flattening the shadows: Secondary illumination should not eliminate the main value structure.
Adding glow without checking composition: A bright effect can accidentally become the focal point.
Getting Feedback on Lighting in Your Drawings
Lighting can be difficult to judge alone. That makes focused feedback particularly useful.
Instead of asking whether the lighting looks good, ask a more specific question:
Does the light source read clearly?
Does the secondary light affect the correct surfaces?
Is the glow overpowering the subject?
Does the surrounding darkness help the light stand out?
Does the lighting direction remain consistent?
A focused question gives fellow artists something concrete to evaluate and gives you a clearer direction for your next drawing.
The Artwod community provides a place for artists to share artwork, explain what they are struggling with, and ask other artists for feedback. (artwod.com)
FAQ
Make the object itself the brightest area, then show how its light affects nearby surfaces. Keep the illumination weaker as it moves away from the source.
How do I make glow look realistic in a drawing?Treat glow as illumination rather than simply a bright effect. Nearby forms should respond to the light according to their position, orientation, and distance from the source.
How do I draw a secondary light source?Establish the primary lighting first, then determine which surfaces face the secondary source. Add a controlled amount of illumination without flattening the existing value structure.
Why does my glowing object look pasted onto the drawing?The surrounding forms may not be responding to its light. Adding subtle reflected or secondary illumination to nearby surfaces can help integrate the source into the scene.
How do I stop glow from overpowering my drawing?
Control brightness, saturation, contrast, and the amount of surrounding illumination. A secondary light source should have a clear role in the visual hierarchy rather than making every nearby area equally bright.
Can feedback help me improve lighting in my drawings?Yes. Another artist can evaluate whether the light direction, value relationships, and secondary illumination are visually convincing, even when those relationships are difficult to judge after repeatedly looking at your own drawing.
Related Posts